Manhunter New York does not have a point system. You need to complete all actions to win the game. The area of New York in which humans are allowed to travel is divided into 6 screens, arranged as shown below. You can see the map in detail here.
So when this walkthrough states to go to "map 4", go for the bottom left screen of New York etc. Locations that can be accessed flash on the map, so they're not hard to find.
Each day starts in your apartment (map 1). You'll receive a new daily task from the sector's supervising Orb and automatically check the MAD (Manhunter Assignment Device) to track where the target has been and perhaps currently still is. You can replay the tracker if necessary. Then it is up to you to visit those locations and find out what you can - primarily the identity of the perpetrator(s). When the day ends, the Orbs will ask you their identities and send you home to sleep.
Location
Action
DAY 1: Assignment: Investigate explosion at Bellevue Hospital
Your apartment
Watch the tracker - the target visits Bellevue Hospital, Trinity Church, Flatbush Bar and the Prospect Park toilet, where the signal is lost.
Press C to close your MAD and travel to Bellevue Hospital (map 2).
Bellevue Hospital
Move around to the right side of the building, where the explosion took place, and enter the hole in the wall.
Notice the security robot preventing access to the hallway, which explains why your target did not get any further.
Look at the face of the corpse lying on the table (keep looking for a death scene). Look at his foot to discover his identity.
Press C to use your MAD, select "Info" and enter "Reno Davis". He's a Manhunter who has been transferred to Chicago, so why is his corpse here?
Go outside and press F3 to return to the city map. Go to Trinity Church (map 3), your target's second destination.
Trinity Church
Enter the church. The tracker showed the target at the left alcove but there's nothing special to see yet. Go outside, press F3 and head for Flatbush Bar (map 5).
Flatbush Bar
Enter the bar. The tracker showed the target at the arcade to the left - try using it.
You are pulled away from the arcade and, while the patrons hold you down with your hand on the table, the bartender throws knives between your fingers. You must then do the same to him to prove yourself.
When you succeed, notice the bartender's secret sign - lifting his right arm 3 times.
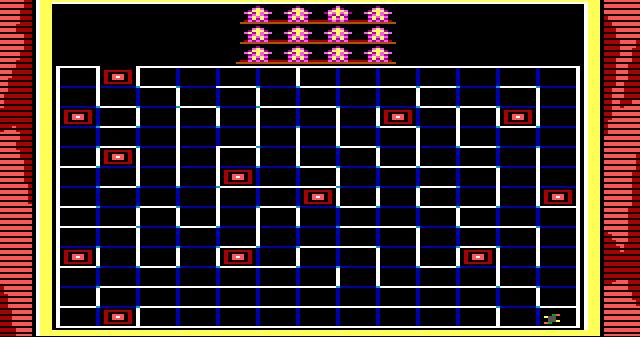
Play the arcade undisturbed now: take the shortest route to the exit, while stepping on all magic squares and avoiding to touch the walls. Remember the location and order of the last 3 kewpie dolls at the top of the screen.
Leave the bar and head for Prospect Park (map 5), your target's final destination.
Prospect Park
Enter the park and the women's toilet where the target went.
Use the toilet on the far right where the target's signal disappeared. Remembering the bartender's secret sign, flushing the toilet three times - you will arrive in the sewers.
The sewers
The layout of the sewers is exactly the same as the maze in the arcade game at the Flatbush Bar. Find a key card at each magic square location of the game. You should have twelve key cards when you reach the exit.
Dryer Offerman Park
You arrive in a cave at Dryer Offerman Park (map 6).
Get the medallion on the dock.
Move to the cave entrance, press F3 and head for Coney Island (map 6).
Coney Island
The Coney Island overview is the same as the arcade's victory screen. Go on the left path and play at the middle booth with the kewpie dolls. Remember the last three dolls you knocked down in the arcade game? Knock them down in the same sequence here:
- third doll on the top shelf.
- second doll on the middle shelf.
- last doll on the bottom shelf.
The booth owner will give you an expectant stare - show him the medallion and he will give a data card, which you auto-insert into your MAD.
Verse 1: "The End is Near. The Way is Clear. Destroy the Lady, before They are Ready."
Verse 2: "Phil is Trouble - He's a Double. He's an Eye, That's no Lie!"
The Orbs override your MAD and demand that you report your target's identity. Since you have not discovered a name, hit Enter or type "Unknown".
DAY 2: Assignment: Investigate theft of maintenance robot from Grand Central Station.
Watch the tracker - there are 3 targets. All three go together to Grand Central Terminal and then split up - we'll track them one by one. After splitting up, the first target (already marked and being tracked) goes to the Wretched Excess Night Club and stays there.
Press C to close your MAD and travel to the Grand Central Terminal (map 2).
Grand Central Terminal
Take a closer look - Orbs are already repairing the damage from the break-in.
Go to the Wretched Excess Night Club (map 3).
Wretched Excess Nightclub
Try entering - the bouncer refuses to let you in.
If you like, press "C", select "Info" and enter the bouncer's name, Louis Redman.
Enter the alley to the left of the nightclub - you'll be confronted by a gang. Move further ahead into the alley.
There are four punks, and you'll have to knock them out one by one. Duck under (down arrow) or jump over (up arrow) the knives and Molotov cocktails until you are close enough to throw a punch (ENTER) - punching and jumping will move you closer to the gangster.
The fourth gang member has a gun - look at his arm movement to decide whether to jump or duck. After punching him, he'll throw you inside the Nightclub.
SAVE THE GAME HERE or you may have to go through the alley again!
Among the crowd in the club, only one wears a brown robe - your target. Look at her and, when she hits you, QUICKLY grab the key card she dropped before the bouncer kicks you out.
Press "C", select the tracker and tag the second suspect by pressing "ENTER" when he runs underneath your pointer. Watch where he goes after splitting up from the others: first to the Vend-O-Deli, where someone joins him to Central Park.
Press F3 and go to the Vend-o-Deli (map 1).
Vend-O-Deli
The target posted something on the bulletin board at the back left, but you don't know what yet. Head to Central Park (map 1).
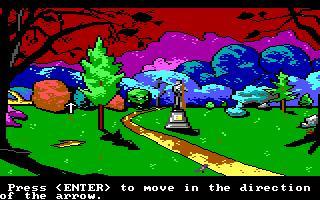
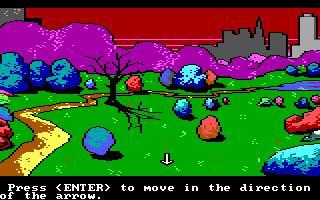
Central Park
Look at the sign: mines! You need to follow the exact path your target and his companion took. There are multiple arrow positions in each direction and you have to get the exact right ones. Position the arrow exactly as shown below and get the crowbar when you see it:
You found your target - dead. The target tried to write a name with his own blood: "Coo...". When entering the park, the designers warned "Don't get your goose cooked!". Look at the target's face and notice the "P" on his forehead. The data card on day 1 said "Phil is Trouble...".
Press "C", select "Info" and type "Phil Cook" - you found the killer's name and address!
Close the MAD and look at the items on the ground. The handkerchief carries the name "H. Osborne" and the note mentions "Anna".
Press "C", select "Info" and type "Anna Osborne". You found the name and address of the woman in the Wretched Excess Nightclub! Now we still need to find the first name of this dead target, which starts with "H".
Vend-O-Deli
Look at the bulletin board at the back left - there is a note left by "Harvey".
Press "C", select "info" and enter "Harvey Osborne", confirming the name of the second target who lives at the same address as Anna Osborne. Head for their home at 150 West 82nd (map 1).
150 West 82nd Street
Go inside, look in the bag on the floor and take the key.
Press the button on the wall to open the back door - you find Anna, hung from the ceiling.
Look at her and notice the "P" on her forehead - Phil did it again.
Go to Phil's place: the Empire State Building (map 2).
Empire State Building
The door is locked for now.
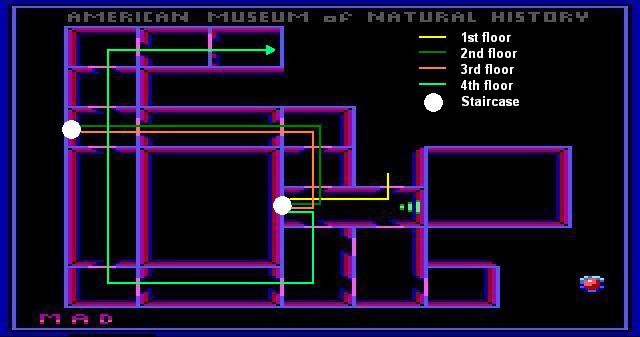
Press "C", select the tracker and tag the third suspect - after splitting up with Anna and Harvey, he heads for the American Museum of Natural History. Look carefully how he walks through the building. Head for the museum (map 1)
American Museum of Natural History
You should have 13 key cards before entering the museum.
Go around the right side of the building and use the key from Osbornes' apartment to open the door.
SAVE THE GAME HERE.
Follow the path of the target, using the key cards to open the doors (move through them before they close).
At the barred wooden door, use the crowbar. A creature will come at you - use your medallion on him and he'll open the barred door for you.
Proceed down the corridor and you'll see the target through a window, followed by an explosion.
Enter the room to find the remains of the stolen maintenance robot which exploded by being tampered with.
Get module A from the target's hand and write down the tattoo on his arm.
Notice the diagram on the wall and press F3 to leave.
The Orbs will now override your MAD: type "Harvey Osborne" and "Anna Osborne". The third target's name is unknown, so press enter.
DAY 3: Assignment: Investigate dead Orb at Greenwood Cemetery
Your apartment
Watch the tracker: the target goes to Greenwood Cemetery, Times Square Theater (where he is joined by another person) and Abdul's Pawn Shop where the signal is lost.
Close your MAD and head for Greenwood Cemetery (map 5).
Greenwood Cemetery
Enter the cemetery and notice whose grave the dead Orb is planted on: Tim Jones who "died for his father".
Head for Times Square (map 2).
Times Square
Enter the theater's office, where the target went. Do the same, and look around. Note the two small pictures in the corner - those are pictures of Tim Jones.
Click the black-white image to reveal a wall safe - you don't have the combination yet.
Before proceeding to Abdul's Pawn Shop, head for Trinity Church (map 3).
Trinity Church
Go to the candles in the left alcove. Remember the tattoo on the dead target's arm? Light the candles as indicated by the tattoo:
- top row, first on the left
- middle row, 3rd from the left
- bottom row, 4th from the left.
Get computer module B from the secret compartment and remember the three symbols on it - two on the inside and one on the outside.
Head for Abdul's Pawn Shop (map 3)
Abdul's Pawn Shop
Enter the pawn shop and approach the counter. To prove your allegiance, Abdul wants you to select three symbols from a board he holds up - the symbols of the secret compartment in Trinity Church: the cross, the star and the symbol above his left hand.
Abdul will activate a trap door and you fall in the underground tunnels.
The Tunnels
You will see four images and have to select the number associated with them:
- Image 1: 41 (written upside down by the tree shadows)
- Image 2: 1031 (October 31, Halloween)
- Image 3: 264 (one less than 3, 3 plus 3 and one greater than 3)
- Image 4: 425 (count the branches of each of three dead sprigs)
Proceed to find your target - killed by Phil again.
Look at the body and note the name "Harry", father of the deceased Tim Jones.
Continue through the tunnel and you'll run into Phil who pulls a knife on you!
Watch Phil's arm to duck or jump the attack and punch him when you get the chance (no need to move forward).
Phil flees but drops a note that he had just stolen from Harry. Pick it up - it's the combination to the wall safe in Harry's office (843769).
Head up the ladder.
Press "C", select "info" and type "Harry Jones" to get his home address.
Head back to the Time Square Theater (map 2).
Times Square
Enter the office, uncover the wall safe and enter the code: 843769.
Get the document - it has the code "UCUCC" written on it.
Head for Harry's residence at 21 Pearl Street (map 4).
21 Pearl Street
Go in and notice the room layout looks like the diagram you found in the museum, with an arrow pointing to the stereo. Look at the stereo (with an Evryware plug) and hit it with the crowbar to find module C hidden inside. Take it.
Head back to the Empire State Building (map 2) to see if Phil is at home this time.
Empire State Building
The door is open, but Phil is not there. Select the computer and turn it on. Insert the password "UCUCC" (from Harry's safe) and "continue" when warned.
There are four main Orb sites listed in the computer:
- ALPHA - this is where the Orbs are processing humans into food and hatching their young. This is the Bellevue hospital where the target on day 1 failed to enter! Access the Security menu and change the first setting to "Hall Patrol" so the security robot moves away from the door.
- BETA - the location of the Orbs' fleet of ships. This is the Grand Central Terminal from where the three targets stole the maintenance robot on day 2. Don't change settings here.
- GAMMA - this is the location the Orbs are using to "purify" the air by pumping out fumes that make it easier for them to breathe, and also make humans sluggish and easier to control. The Orbs' main radar and anti-air defense systems are also located here. This is the Statue of Liberty as indicated by the note on the data card ("Destroy the Lady before they are ready"). Access the Security menu and ensure that Ground Patrol is selected so that the anti-air defense system is not manned.
- DELTA - this location houses the Orbs' central computer system as well as their main radio transmitter. This is what you are messing with right now, so the Empire State Building. Do not change any settings here.
Return to the main menu and select Quit to leave the computer.
Press F3 to leave. The Orbs will override your MAD. When prompted for a name, type "Harry Jones".
DAY 4: Assignment: Investigate illegal access at Alliance computer
Your apartment
The Orb informs you that, after today, you are being transferred to Chicago (like Reno Davis, remember him?)
Your MAD tracker will zoom in on the Alliance computer's I/O buffer. Tag the first signal that enters from the bottom funnel, after which it will be fed into the analyzer. If you lost which signal it is, restart it.
Once the correct signal has been analyzed, watch the tracker and you'll see that - you are tracking YOURSELF (due to hacking into the Empire State Building computer)! Time to switch sides - you'll be Orb baby food if you don't anyway AND you already have three modules AND know where the Orb ships are. The only place where the 4th module can be, is where the humans failed to break in: Bellevue hospital. Travel to Bellevue Hospital (map 2).
Bellevue Hospital
Enter through the hole in the wall. If you set the computer correctly, the robot who was guarding the doorway will be gone. Go through the door and into the hallway.
An Orb will spot you and a security robot will chase you down the hall, capture you and throw you into a room with a large pile of skeletons.
Climb the pile and look through the window grid - a room where human corpses are processed into Orb food! Wait until the conveyer belt stops supplying corpses - the robot will shut down the machine and the room will be cleared (if you set the computer correctly).
Use the crowbar to pry off the grid and enter the room.
Zoom in on the control panel and get module D.
Restart the conveyer belt in the opposite direction (pull the handle up, not down) and climb up onto the conveyer belt to arrive in the electrical grid room.
Get to the upper left side exit of the room, using the hanging cables without getting hit by cascading power surges.
You fall out of the hospital window. Head for the Grand Central Terminal (map 2).
Grand Central Terminal
Zoom in and pry the panel open with your crowbar.
Enter the Orb spacecraft through the open hatch.
Orb Spaceship
Insert all four modules into the slots in the panel.
Power up the ship by pressing the button to the left of the monitor. Close the ship's hatch by pressing the large button directly below the monitor.
Arm the ship's bombs by pressing the button to the right of the screen.
Open the hangar door by pressing the bottom right button.
Take off by pressing the button on the bottom left.
Fly through the hangar door and you will find yourself in a maze of underground tunnels. Fly through it to the exit:
You will appear at the surface in Prospect Park (map 5) and Phil climbs into his spaceship to destroy you!
Press the viewscreen button on the control panel to see yourself flying over New York.
Above the City
You need to drop a bomb on each of the four Orbs' strongholds. You have only four bombs, so each bomb must be a hit (it will show the destroyed building).
- ALPHA - Bellevue Hospital
- BETA - Grand Central Station
- GAMMA - The Statue of Liberty
- DELTA - The Empire State Building
See the map to have their location. Be careful as Phil will try to make you crash, so avoid him as best as you can and save the game often.
You will land your ship and people will come and hail you as a hero. But then Phil comes and vaporizes your fans. You chase him into the next adventure in San Francisco.