After Nicole's welcome, head for the computer console (1) and watch the crew introductions. Notice the elevator code O'Toole provides ("4143") and that Wakefield created Puck for you, which he left in his locker. When you leave the computer, an avian will fly by.
Head for the lockers (2) and use the key, labeled "2" on locker 2, your locker. Get the wrest computer and the ISA Multi-tool.
Open the unlocked locker 9, Wakefield's locker, and you will get Puck.
Sabatini will video-mail you, asking to bring her cigaret lighter to the base camp. Go down the ladder behind the lockers and go towards the nuclear device (3). Get Sabatini's key, labeled "6" from the device.
Go back to the lockers, unlock locker 6 with Sabatini's key and get everything from her locker: her lighter, 3 symbol plaques, a blank key, a data cube #4, a New York map plaque and a Central Plains map plaque.
Use the data cube on your wrist computer to read a message from Sabatini to Brown. Use all data cubes on the wrist computer from now on.
Use the blank key on locker 7, Heilmann's locker. Get data cube #12 and try to read the message from Heilmann to Tabori and Yamanaka. The message is encoded, so we'll find a way to read it later. Get the optical lens from the locker.
If you stay long at the hub camp, Nicole will send a vidmail to remind you to come to base camp. Head to the cable car (4), type in O'Toole's code ("4143") and enjoy the scene.
CENTRAL PLAINS
Base camp
Upon arrival get out of the cable car and head for the table in front of you. Get Nicole's note and data cube #15 from the table for a commercial of Arthur C. Clarke's novel "3001: the Final Odyssey".
Go to the Specimens box on the table next to the cable cart and get map and symbol plaques you may find there. If, later in the game, you're missing plaques to solve door puzzles, come check this box again, as well as the refrigerator next to it.
Walk between the lockers towards the exit, and you'll meet Irina Turgenyev who reveals they're planning to capture a crab biot, and isn't very happy about the idea.
Exit towards the Central Plains and proceed until the Central Plains map shows up.
Centipede
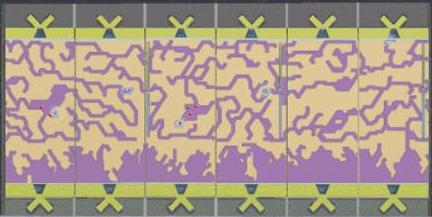
You are at the base camp (1). Click on highlighted places on the map (not marked above since they are randomized), looking for 4 moving green squares (avoid the triangular dot formations which are deadly crab biots!). These are centipede biots which usually drop a symbol plaque while passing by. Get the symbol plaque, if any, return to the map and repeat this until a centipede no longer drops a symbol plaque.
Nicole
Search for Nicole des Jardins (person 012) and watch the animation.
Biot garage
Head for the Biot garage at 3 o'clock (2).
Get any plaques you encounter: near the plaque embedded in the cube (which will become available later), under the bridge-like structure and so on.
Go to Reggie Wilson at the trash machine. You'll get data cube #7, showing crab biots. Also check the trash machine's tray for symbol plaques.
On the way to the large building, the biot garage, get the red shard from broken sphere in the sand.
In the biot garage, use Puck on all biot types to get a description.
Return to the Central Plains map and go to London at 1 o'clock (3)
London
Listen to Takagishi, referring to a pattern in the pulsing of the force field.
Save the game. After every 9 pulses, there is a short break. Cross the force field during that break.
Pull the switch to deactivate the force field and head for the London building entrance.
Solve the door plaque puzzle and enter.
Rama room
Look for plaques as usual, particularly at both doors and between the columns.
Observe Rama's presentation on the left side of the room
Solve the maps on the right side of the room: the left map is for the plaques, forming an oval shape, representing New York. Click on the solved puzzle to see pictures of the Avain, Octospider and Human Plazas. On the right map belong the map plaques, representing the Central Plains.
Click on the map locations to see pictures of the locations
Solve the door plaque puzzle at the far end of the room and proceed.
Sewer room
Go to the right back of the room. You'll see a Mantis biot activate an elevator with a red laser.
Proceed to the back right and get the biot box (notice the triangular shape o the back)
Combine the red shard with the ISA multi-tool flashlight to create a red laser.
Use the red laser on the elevator light, get on the elevator and use the laser again to go down to the sewer.
Pick up all dirty (and clean, if any) plaques, return upstairs with the elevator and return to the switch pedestal at the force field outside.
London
Use the biot box on the pedestal and get the symbol plaque inside it.
Head to base camp (1)
Base camp
Get the box of powder from the fridge and any other items that may be in the fridge or specimens box.
Go to the Giant Wheel area at 10 o'clock (4)
Giant Wheel
If Francesca is there, she'll give a decryption card. Use it on the arm computer to decipher encrypted messages.
Check the trash biot's tray for a symbol plaque (and keep looking around for other items as you explore).
Get the metal seed near the other exit of the Giant Wheel area.
Pick up the bent rod next to the damaged trash biot
Move to the distillation mechanism (an avian will fly by)
Use the box of powder on the device, insert the metal seed and turn the wheel to get fluid in the system.
Zoom in on the right part and press the triangular button to clean the tray.
Place a dirty symbol plaque on the tray and pres the button to clean it. Repeat doing this until you're out of fluid. If you still have dirty plaques, exit to the Central Plains, return and a new metal seed will have grown. Then repeat the procedure until all dirty plaques are cleaned.
Return to the Central Plains map and find Wakefield (009)
Wakefield
Wakefield gives you the third optical lens
Giant Wheel
Go to the cannon in the center and place all three optical lenses in it. The cannon will shoot, freeing the plaque embedded in the cube near the biot garage (2).
Biot garage
Get the symbol plaque from the destroyed cube and check the trash biot's tray once more. Then return to London (3)
London
Go to the left of the sewer room and solve the door puzzle
Biot display
Check the displays of various biots.
Before the spider biot, take a left into the corridor and fire a green laser from the device to disable the spider biot
In the now-unguarded back of the display room, pick up the alien palette and pull the lever to activate a video link with the Giant Wheel control room.
Return to the Central Plains map. On the way, Nicole will give a data cube about Wilson's death and you will receive two vidmails from Wakefield and Brown about Rama course correction.
Head for Bangkok at 9 o'clock (5)
Bangkok
Solve the door plaques puzzle and enter level 1
Bangkok level 1
Look at the decimal system displays on the right side
Turn to the other side and solve the computer questions from left to right.
The first computer wants you to simply retype the decimal number. When it's done, a panel opens. Look inside and activate the lever to open the door.
The second computer wants you to type the number of dots it displays on the screen (11 dots per row). When it's done, a panel opens. Look inside and you'll see a pile of dust which you can't pick up and don't need.
The third computer wants you to add and subtract decimal numbers. When it's done, a panel opens. Look inside and get the red gem.
Enter the next room and look around at the human displays.
Go to the elevator, solve the door plaque puzzle and go to level 2
Bangkok level 2
Look at the Raman hexadecimal system displays on the right side
Turn to the other side and, after the Wakefield cut scene, solve the computer questions from left to right.
Retype the symbols on the first computer. When the panel opens. Look inside and activate the lever to open the door.
The second computer wants you again to type the number of dots it displays on the screen (11 dots per row). Since the hexadecimal system has 16 symbols (from 0 to F), simply divide the number of dots by 16 and add the leftover. For example the number 105: Divide 105 by 16 to get 6.5625. Multiply the whole number (6) by 16 again to get 96. The leftover, 105-96, equals 9. So the hexadecimal number for the number of dots on the screen equals 69 which you need to type using the hexadecimal keyboard. When all counting is done, a panel opens. Look inside and you'll get a human icon.
The third computer wants you to add and subtract hexadecimal numbers. Best to use a calculator which supports the hexadecimal number system for this. When it's done, a panel opens. Look inside and get the red gem.
Enter the next room and look around at the avian displays. Make sure to pick up the Raman cutting tool.
Go to the elevator, solve the door plaque puzzle and go to level 3
Bangkok level 3
Look at the octospider octal system displays on the right side
Turn to the other side and solve the computer questions from left to right.
Retype the colors on the first computer. When the panel opens. Look inside and activate the lever to open the door.
The second computer wants you again to type the number of dots it displays on the screen (11 dots per row). Since the octal system has 8 symbols/colors (from 0 to 7), simply divide the number of dots by 8 and add the leftover. For example the number 45: Divide 105 by 8 to get 5.625. Multiply the whole number (5) by 8 again to get 40. The leftover, 45-40, equals 5. So the octal number for the number of dots on the screen equals 55 which you need to type using the octal keyboard. When all counting is done, a panel opens. Look inside and you'll get an octospider icon.
The third computer wants you to add and subtract octal numbers. Might as well use a calculator which supports the octal number system for this as well. When it's done, a panel opens. Look inside and get the red gem.
Enter the next room and look around at the octospider displays. Make sure to pick up the indigo-green jewel.
Return to the elevator, place the three red gems in the receptacle and get the number box.
Return to the Central Plains map and go to the Giant Wheel area (4).
Giant wheel
Go to the damaged trash biot, zoom in on its panel and use the alien cutting tool on the wire.
Use the bent rod on trash biot's arms to free the avian. He'll give you his neck ring.
Go up to the wheel itself. When standing on the wheel, go 3 moves clockwise and head for the center of the wheel.
Look at the display screen and press the right button to see a Mantis bot release Spider bots from the biot garage (the left button shows the biot display room console).
Return to the Central Plains map and head for the biot garage (2).
Biot garage
Pick up the fence in the garage and return to the Giant Wheel control room
Giant Wheel
Put the fence on the left side of the monitor, climb it and get the blank plaque
You can go back to hub camp (1) and use the cable car) to see Rama in daylight. You can also find Heilmann (007) to hear his rant. Then head for the Ice Port at 5 o'clock (6).
Ice Port
Listen to Brown and check the 3 videos on data cube #6 he gives.
Check out the nuclear device
Head down to the ice mobile and enjoy the ride with Nicole.
NEW YORK
Outside NY
Go up the stairs and use the alien palette to open the door
Entrance avenue
Upon entering, get data cube #17 and read Heilmann's message.
Proceed to the Avian Plaza (1)
Avian Plaza
Head to the tone recording machine in the cul-the-sac (1)
Place the blank plaque on the device, and use the green arrow buttons to move all the way left and back all the way right. This records tones on the plaque and opens doors in the New York corridors. You will in fact hear the tones as you pass those doors.
Check out the raman picture (located between 1 and 2) to see the Rama melon symbol.
Leave through the other corridor to enter the New York corridors.
NY corridors
Explore the entire corridors (both directions) to find five forked devices. Puck will point them out for you.
Go to the Octospider Plaza (2 on NY map)
Octospider Plaza
Move to the south-east corner of the map (the corner between 1 and 2) and get the blue filter.
Move a bit north-east of the map (south-east of 2) and get the green-green jewel.
Go to the north-west corner (left of 4) and get Takagishi's video camera. Remove data cube #13 from the recorder and watch it on your computer.
Head for the Human Plaza (3 on the NY map)
Human Plaza
Go to (1) and notice there is a gap.
Move to the bottom center of the map and get the blue-yellow jewel
Go to the tone device (2) and get the green-red jewel.
Go to the tuning fork sculpture (3) and place the blue fork device (with 1 red mark) on it.
Turn around and watch a Mantis biot come out of the pyramid and open a door with a blue laser
Create a blue laser by combining the blue filter with the ISA Multi-tool flashlight, go to the door (4), use the laser and enter the subway
Subway
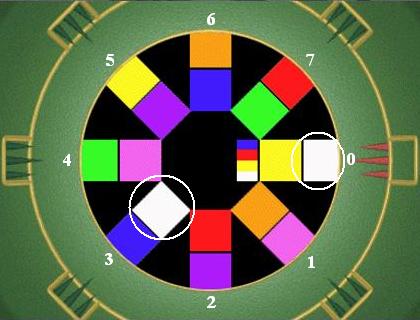
Sit in the chair and press the red button to move around rooms (one door is closed). Each room has 3 pictures of life forms which need to be sorted by size: 1) Protozoa 2) ant 3) snail 4) frog 5) cat 6) eagle 7) seal 8) cow 9) elephant.
When all lifeforms are sorted, the previously closed door will be open. Go to it, sit in the opposite chair and press the red button. Enter the room, press the yellow button and you will see a rising platform. This bridges the gap at (1).
Head back to the Octospider Plaza (2 on NY map)
Octospider Plaza
Head to the left side of the Grotto (slightly south-west of 3) and get the indigo-yellow jewel
Enter the grotto (3)
Grotto
Use the green-green jewel to obtain O'Toole's anniversary picture from the bright green pedestal. Notice the number on the back (which changes every game). This is part of the bomb disarming code.
Use the blue-yellow jewel on the gray-white pedestal to the right to get the red-yellow jewel.
Use the ISA multi-tool flashlight (without color filter) on the prism on the central pedestal between the columns. If necessary rotate the prism about 5 times by clicking on the mirror. Get the prism.
Other items you don't need. Return to the Octospider plaza
Octospider Plaza
Go to the pyramid (1), use the prism on the door mechanism, and use the ISA multi-tool flashlight on the prism. Enter the pyramid.
Pyramid
Match the 3 colors to reveal the door to the octospiders' lair (4):
Left color: left and center slides down, right slide 3/4 up
Center color: left slide 3/4 up, center slide 2/4, right slide all the way up
Right color: left slide 2/4, center slide 3/4 up, right slide 1/4 up
Return to the Avian Plaza (1 on NY map)
Avian Plaza
Go to the white ramp (2) and use the red tone fork (four red marks) on the nearby similarly-shaped depression in the wall. Repeat this until the white ramp is in front of the door on the far left.
Go up the white ramp and get the piston device from the room
Go to the stair-shaped statue ner the white ramp, place the piston device at the statue's foot and activate it to tilt it over.
Climb the stair and get the avian perch on the right side.
Go to the pyramid (3) and palce the neck ring on the avian statue.
Place the perch on the stairs of the pyramid and turn the handle. Enter the pyramid.
Pyramid
Press the red button, turn the dial to select the Rama melon symbol and click on the slider. This opens the access to the shadft of the Avian lair.
Avian Plaza
Go to the center of the plaza and watch an avian pass towards the NY corridors
Follow the avian to the Avian shaft (4) and enter it.
Avian Shaft
Go to the avian nest (2)
Avian Nest
Go to the avian, take the melon and cut it in half with the ISA multi-tool knife. Eat one half with the ISA multi-tool spoon and notice the ultraviolet markings on the walls. Give the other half of the melon to the avian.
Go up the elevator and take the Avian translator. Turn left to view the entire roost, and turn back to the leader to go down again.
Get two more melons from the dispenser and head for the theater (3).
Theater
Get the oil-filled gourd from the stage and go to the dressing room (4).
Dressing room
Watch the avian. After he disappeared, get the costume pendant from the octospider costume.
Return to the shaft and poor oil on the bridge mechanism by the door. Activate the mechanism.
Shaft
Go to the schoolroom (6)
Schoolroom
Notice the number above the doorway (11, 8, 3)
Go to both murals beside the entrance and eat half a melon when looking at them. One reveals the number (6, 9, 8), the other shows the number "4" on the right side of a circle in human decimal, octospider octal and avian hexadecimal symbols.
Go to the control room (1). Type the door code in the avian translator (7, 2, 15) and enter
Control room
Go to the control panel
Turn the red dial twice, type in the schoolroom code (11, 8, 3) (buttons go from 1 to 4 on the first row and so on) and put the right slider bar to the bottom (the monitor will show the schoolroom stage becoming accessible).
use the avian translator on the door again(7, 2, 15) and head for the hatchery (5).
Hatchery
Go to the back right of the hatchery and climb overhead bars to get to a recess near the ceiling.
Get the alien cable, go back down and return to the schoolroom (6)
Schoolroom
Go to the elevator on the schoolroom stage, attach the rope to the elevator's handle and climb down to the lower level.
Lower level
Walk right into the storage room (7) and get the bowl.
Head for the pool room (8)
Fill the bowl with acid from the pool (notice the pendant), go to the pool mechanism in the center and poor the acid on the corroded handle.
Lower the handle, turn the arrow towards the lower left and raise the upper-right handle. Push the red button on the arrow to drain the pool.
Get the pendant, return to the schoolroom (6) and head for the hatchery (5).
Hatchery
Zoom in on the panel on the back of the large purple cylinder. Use both the costume pendant and the pool pendant on the triangular shape and get the magnetic card.
Go to the control room (1), use the avian translator to open the door (7, 2, 15) and enter.
Control room
Enter the elevator shaft on the right side, type the avian code in the translator (9, 14, 7).
Go to the bridge control panel, insert the magnetic card and insert (6, 9, 8) on the keypad to extend the bridges.
Return to the shaft (using the translator when needed) and go up, out of the avian shaft.
Avian Plaza
Watch the cut scene where Wakefield informs you about the bomb and gives you Falstaff. Six-hour countdown starts!
Go to the Octospider Plaza (2 on NY map)
Octospider Plaza
Go to the entrance of the Octospiders' lair (4)
Place the Octospider icon and costume pendant on the door mechanism to unlock it.
Octospider Lair
You enter at (1). Go down the ramps to (2). You'll step on a round platform in a hall
Go through the door left of the entrance towards the fountain room (3)
Fountain room
Use Falstaff to retrieve the blue-orange jewel from behind the door where the octospiders went.
Get the 3 datacubes (#9, #10 and #11) from Sabatini's uniform and watch them
Press the third white from the left on the left keyboard on the fountain. This opens a panel on the opposite side of the room.
Turn around, place the indigo-yellow jewel in the panel's receptacle and retrieve all jewels from the panel.
Head back to the entrance hall (2), using the blue-orange jewel to open the now-closed door
Entrance hall
Go on the sinking platform in the center
Look up to the ceiling to see a diagram representing a 2-digit octal number: the outer circle represents the first digit and the inner circle represents the second digit (the diagram changes every time you step on the platform). Count the number of positions that the white color is displaced clockwise, starting from the home position at the right, for both the inner and outer circle. Multiply the number of displacements from the inner circle by 8 and add the number of displacements from the outer circle. Remember this number.
For example the picture below represents the decimal number 24, being (3 X 8) + 0
Open the door right of the entrance , using the yellow-red jewel and go to the end of the corridor.
Corridor
Zoom in on the device at the right, press its blue button, mark the number from the ceiling diagram and press the blue button again. This activates the spikes in the shaft were about to enter.
Open the door with the green-red jewel and go down the shaft (6) to the lower level of the octospiders' lair (7).
Lower level
Move to the map at (8) and press the blue button. This opens the door to the Octospider teacher at (5).
Since you stepped on another sinking platform, look up and figure out the ceiling diagram number. Return to (7) and use the device to insert the number. Also notice O'Toole's crucifix in this room.
Go up the shaft and towards the trophy room (4).
Trophy room
Check out the stuffed Takagishi, the stuffed avian and the pictures in the wall. Also notice the number wheel where the right side is again emphasized.
Enter the Octospider teacher room (5), using the orange-red jewel to open the door.
Octospider teacher
When the teacher displays 7, turn around the color tower and select the light purple color. The teacher will give O'Tool's catechism card and leave.
Get O'Toole's number chart from the top of the tower and the organic lump from the bowl.
Go to the subway room (9) in the lower level.
Lower level
Put the organic lump in the small subway tube, followed by Falstaff.
As Falstaff, pick up the organic lump and press the white button of the subway car to move to the Octospider dining area (10).
After the big Octospider steals the food of the small one, get the hand laser on the left, put the organic lump in the empty bowl, and get O'Toole's ID card on the right.
Get back on the subway car and press the white button to return to normal perspective.
Notice Sabatini's scarf in the large inoperative subway tunnel.
Check the new ceiling diagram number at (8), insert it on the device at (7), exit the Octospiders' lair and go to the Human Plaza (3 on NY map).
Human Plaza
Go to the door (1) and insert the human icon and pool pendant to open it.
Solve the number wheel puzzle by rotating the rings, displaying 9 on the right side of each ring (clicking the inner, middle and outer rings 3, 1 and 4 times respectively). Enter the room
Nuclear device
Use the hand laser on the reflection of the crane biot at the left to disable the spider biot.
Disarm the bomb: check the numbers on O'Toole's anniversary photo, catechism card and ID card, and see which 4-digit numbers they represent on O'Toole's number sequence chart. The catechism card appears to always have 15 and 33 on its back, being number 0251 and 1097 of the number sequence which are filled out on the first and last place of the bomb's disarming code. Fill the remaining three 4-digit numbers out, using the already-filled numbers as the clue on where to place them.
Press the Input button, go back to the human plaza and enjoy the final cut scene!